
Although the drawers still slide smoothly and the dresser is constructed from solid wood, the surface tells a different tale. It features dings, scratches, and deep gouges, with some patches feeling sticky to the touch. Even when priced below $25, most shoppers overlook this type of piece.
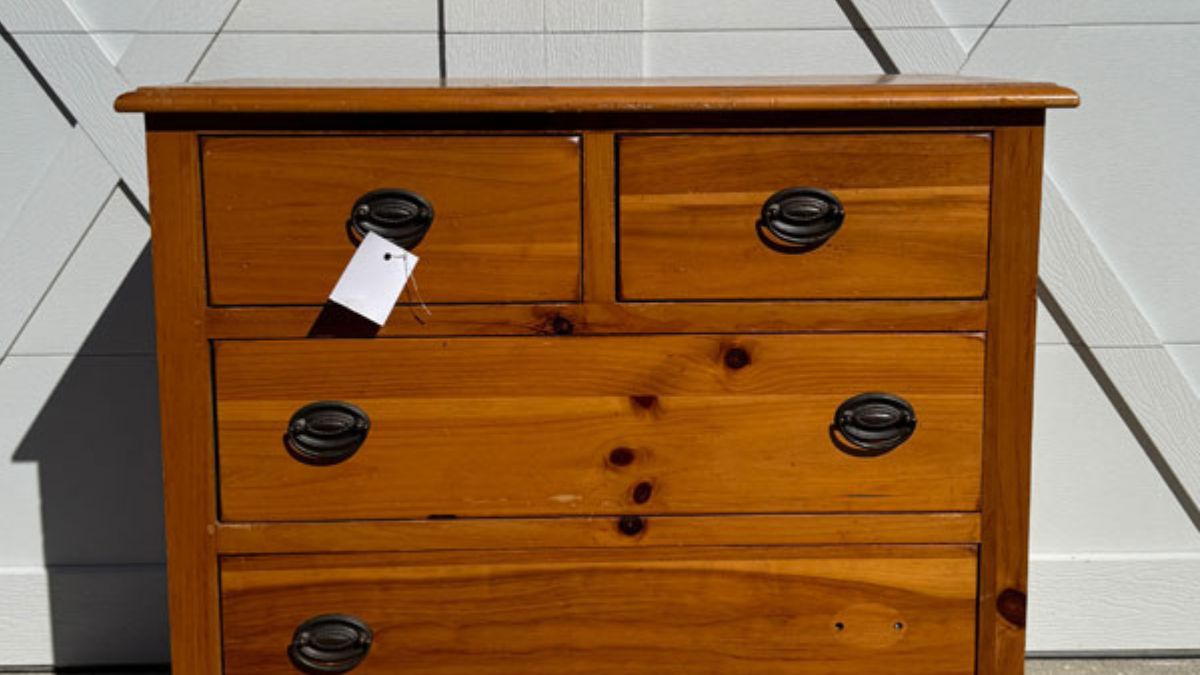
The issue lay not with the dresser itself but with its top. Christy, the author behind the blog Confessions of a Serial Do-it-Yourselfer, discovered a full-size American Drew dresser made of solid pine that matched this description. Initially listed at $34.95, the price dropped to $24.92, prompting her to purchase it.
Addressing a Sticky and Gouged Surface
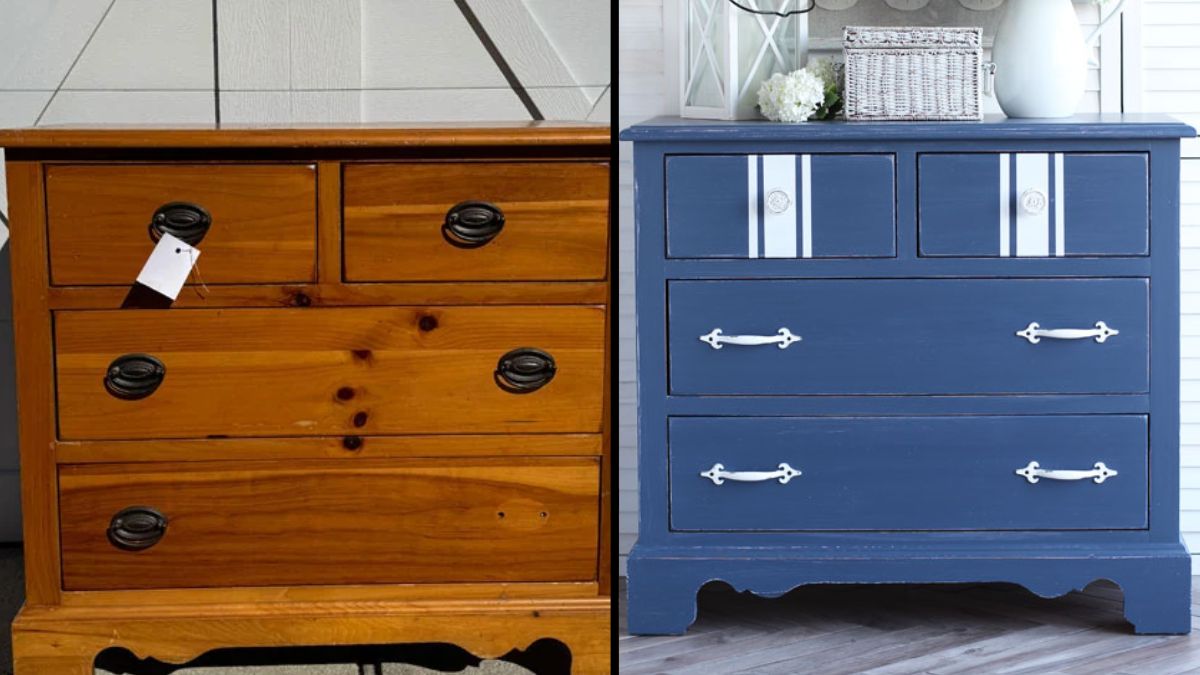
Since the top is the most visible and frequently touched area, every imperfection catches the eye. Sanding is not always the immediate solution. Christy noted that the surface was quite sticky in certain areas, and she did not want to grind that stickiness into the wood while sanding. Therefore, she cleaned the piece before proceeding. The drawer interiors were in pristine condition, requiring only a cleaning.
A rough finish does not necessarily ruin a solid piece of furniture. For instance, a French Provincial dresser found on the roadside, which had a chipped dark finish and white paint marks, was restored after sanding and applying two coats of a blue mineral paint named Nautical.
Applying a Single Coat of Blue
- Clean the surface twice. Christy created a cleaning solution by mixing 1 tablespoon of White Lightning into a half gallon of warm water. She scrubbed the dresser with applicator pads and then wiped everything down with clean water.
- Sand without creating a dust cloud. She utilized an orbital sander, starting with 100-grit paper and moving to 220-grit. To manage the dust, she attached her sander directly to her shop vac using Gorilla Tape. A University of Idaho Extension guide on refinishing furniture recommends two key practices: sanding with the grain and keeping the surface free of sawdust.
- Fill the gouges. Deep dings were filled with Dixie Mud. Once dry, the filled areas were sanded smooth with 100-grit paper, followed by a final cleanup with the shop vac and a clean cloth.
- Prime the knots and the entire piece. White Bonding BOSS was applied to the pine knots first to prevent bleed-through. It was then applied over the entire piece to ensure white would show through later. The primer was allowed to dry for 24 hours.
- Paint once and distress. A single coat of Dixie Belle Yankee Blue was applied. Raised areas were then sanded with 220-grit sandpaper wrapped around an old sanding sponge. Christy explained that she wanted a relaxed coastal feel, so she applied only one coat of paint.
- Add a stripe and seal. A grain sack stripe was added to the top two drawers. FrogTape for delicate surfaces was used to tape off the wide center stripe first, which was allowed to dry completely before a thin stripe was added to each side. Two coats of Dixie Belle Clear Coat in Satin were applied, and white pulls were added to finish the piece.
- Clean the surface twice. Christy created a cleaning solution by mixing 1 tablespoon of White Lightning into a half gallon of warm water. She scrubbed the dresser with applicator pads and then wiped everything down with clean water.
- Sand without creating a dust cloud. She utilized an orbital sander, starting with 100-grit paper and moving to 220-grit. To manage the dust, she attached her sander directly to her shop vac using Gorilla Tape. A University of Idaho Extension guide on refinishing furniture recommends two key practices: sanding with the grain and keeping the surface free of sawdust.
- Fill the gouges. Deep dings were filled with Dixie Mud. Once dry, the filled areas were sanded smooth with 100-grit paper, followed by a final cleanup with the shop vac and a clean cloth.
- Prime the knots and the entire piece. White Bonding BOSS was applied to the pine knots first to prevent bleed-through. It was then applied over the entire piece to ensure white would show through later. The primer was allowed to dry for 24 hours.
- Paint once and distress. A single coat of Dixie Belle Yankee Blue was applied. Raised areas were then sanded with 220-grit sandpaper wrapped around an old sanding sponge. Christy explained that she wanted a relaxed coastal feel, so she applied only one coat of paint.
- Add a stripe and seal. A grain sack stripe was added to the top two drawers. FrogTape for delicate surfaces was used to tape off the wide center stripe first, which was allowed to dry completely before a thin stripe was added to each side. Two coats of Dixie Belle Clear Coat in Satin were applied, and white pulls were added to finish the piece.
Christy remarked that the prep work was more extensive than anticipated, but the result was quite cute.
If you prefer a solid color over a worn look, you can add a second coat of blue and skip the distressing step. The single coat is a stylistic choice rather than a shortcut.
Limitations of a Single Paint Coat
A thin coat over white primer is designed to wear, allowing edges to soften with use. The two coats of clear coat are particularly important in this context, especially on the top surface. Distressing can be easily overdone; Christy noted that she sanded one side a bit heavily, so it is advisable to work with a light hand and check your progress frequently.
Sanding produces fine dust even when a shop vac is attached. Wear a dust mask, and if the piece is secondhand, test the old painted layers for lead before sanding. Once the dresser is placed in a bedroom, anchor it to the wall, especially if children are present.
Clean, fill, prime, and let one coat of blue do the rest. That is the secret to this restoration.
Source: Homedit.




















































Love this transformation! The Yankee Blue looks stunning against the solid pine. Great tip about cleaning before sanding to avoid grinding in that stickiness. Such a smart find for under $25.
Thank you so much! I’m thrilled you love the Yankee Blue finish. It really does pop against that warm pine wood. You’re right—the pre-sand cleaning step makes a huge difference in achieving that smooth, professional look. Happy to share the budget-friendly secret!